 Process ActiveJob background jobs with gem good_job and Postgres without Redis
Chapters:
- ActiveJob
- Gem good_job
- Deploying to production
“Background jobs” or “background workers” are a very important concept in software development. You can create complete architecture based on tasks that will perform independently from the client side request-response cycle.
Background jobs are often used for processing heavy tasks that take too long to perform during a typical web request. Additionally, you can use them when the user is not expecting an output immediately.
Jobs can be scheduled to be processed:
- As soon as there is resource capacity
- Once, at a specific time
- In X time from now
- Recurringly, once every X period of time (CRON jobs)
Example usecases:
- Process importing of multiple records
- Autogenerate & send daily/weekly/monthly reports
- Schedule sending a reminder email 30 minutes before an event
- Processing an image or a video after upload
It is also normal for a job to trigger multiple jobs!
Real life scenario: In my app insta2blog.com, I use jobs to:
- Refresh Instagram bearer API tokens every 7 days (CRON)
- Iterate through all the users instagram posts and copy them into the app (this process can take a few minutes)
The Rails feature for processing jobs is called ActiveJob. It is an inbuilt feature, and you have a /jobs folder in any new Rails app by deafault.
1. Use ActiveJob #
Generate new job:
rails g job MyThing
This job will just log something into the console:
# jobs/my_thing_job.rb
class MyThingJob < ApplicationJob
  queue_as :default

  def perform(text)
    puts "Console message: #{text}"
  end
end
Schedule a job for later:
MyThingJob.perform_later
MyThingJob.perform_later(text)
MyThingJob.set(wait: 1.week).perform_later(text)
MyThingJob.set(wait_until: Date.tomorrow.noon).perform_later(text)
MyThingJob.set(queue: :another_queue).perform_later(text)
Job processing adapters #
To handle job processing, you will need an external adapter. The most popular one is Redis-based Sidekiq. You will encounter this solution in most enterprise Rails apps, at mostly any Rails job you have in your career.
However Postgresql adapters are enough for most usecases, and this way won’t need Redis as an extra dependency. A really good gem for this is good_job.
2. Use gem good_job #
Add the gem:
bundle add good_job
Use it as the default adapter:
# config/application.rb
  class Application < Rails::Application
+    config.active_job.queue_adapter = :good_job
  end
Run the good_job worker in your console:
# Procfile.dev
web: bin/rails server -p 3000
css: bin/rails tailwindcss:watch
+ worker: bundle exec good_job start --max-threads=8
Different job execution modes:
# echo > config/initializers/good_job.rb
# config/initializers/good_job.rb
Rails.application.configure do
  # dev env: rails server, separate thread
  # config.good_job.execution_mode = :async

  # test env
  # config.good_job.execution_mode = :inline
  # config.good_job.inline_execution_respects_schedule = true

  # prod env: separate $ worker
  # config.good_job.execution_mode = :external
end
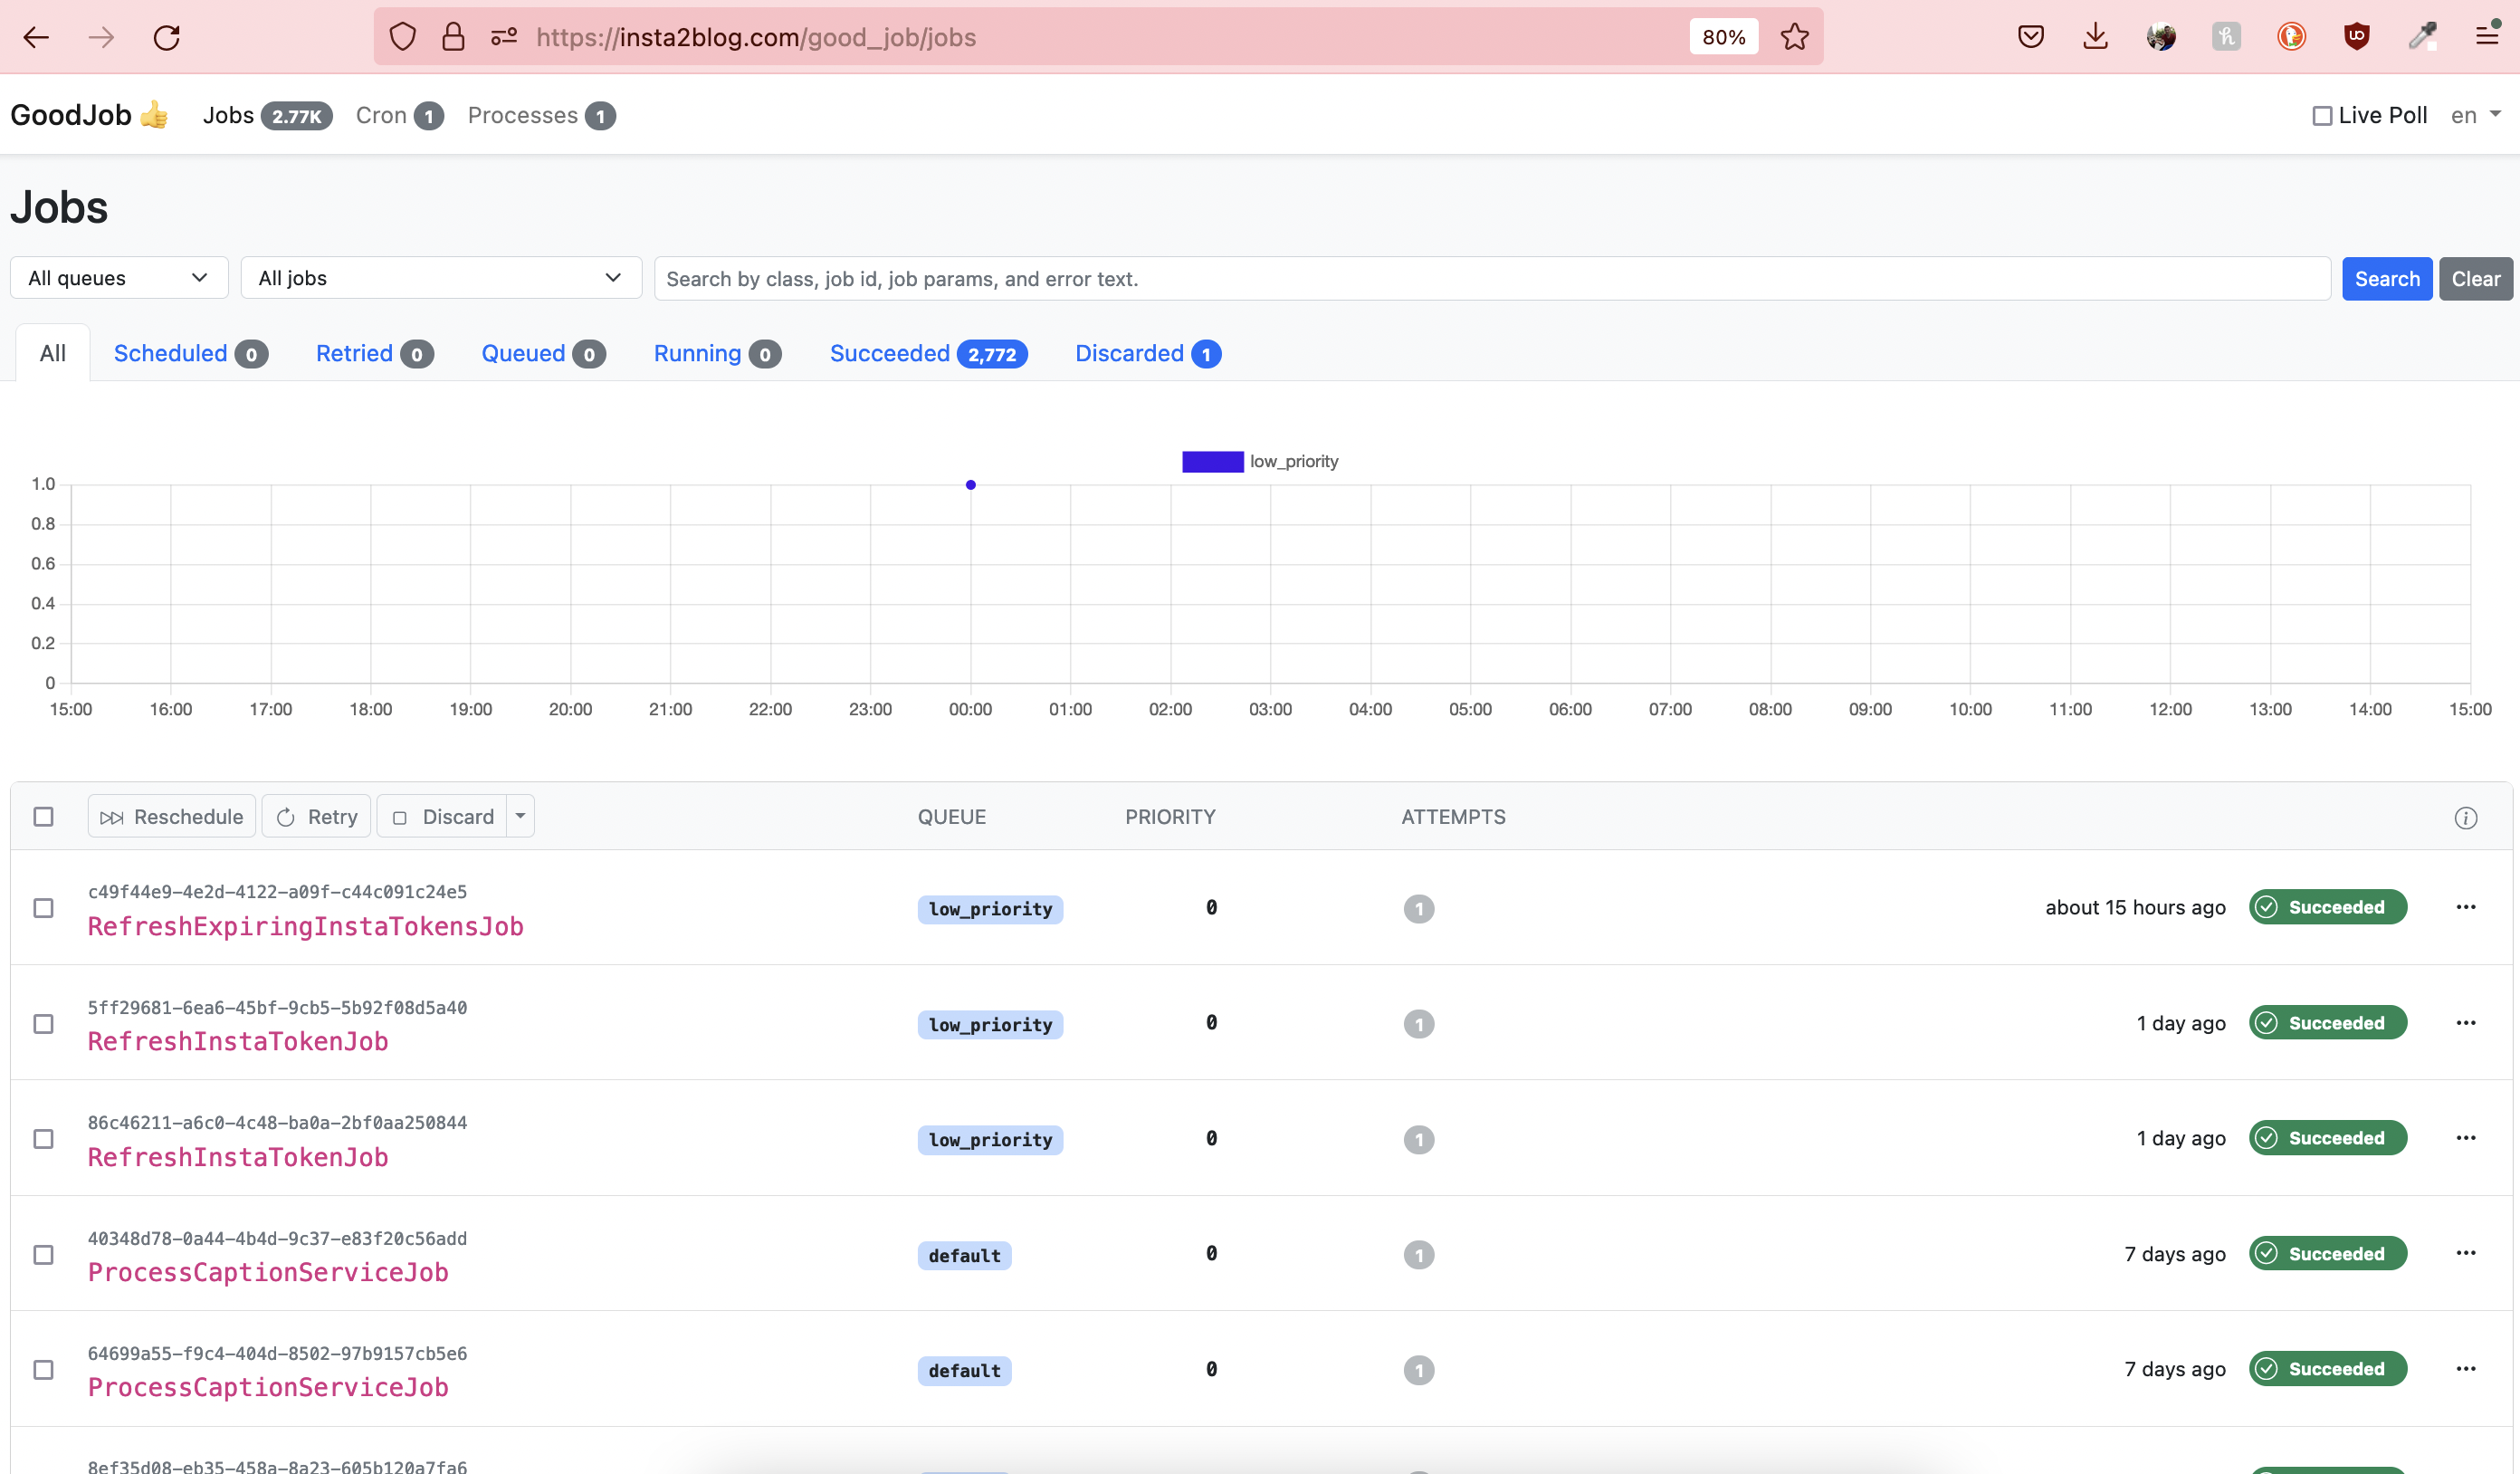
3. GoodJob GUI Dashboard #
You can monitor all past and scheduled jobs in a web GUI. To do so, add the route:
# config/routes.rb
+  mount GoodJob::Engine, at: "good_job"
Voila, now when you visit http://localhost:3000/good_job/, you will have a dashboard:
To restrict unauthorize users from accessing this dashboard in production, you migth want to require HTTP basic authentication:
# config/routes.rb
+  GoodJob::Engine.middleware.use(Rack::Auth::Basic) do |username, password|
+    ActiveSupport::SecurityUtils.secure_compare(Rails.application.credentials.dig(:http_auth, :username), username) &&
+      ActiveSupport::SecurityUtils.secure_compare(Rails.application.credentials.dig(:http_auth, :password), password)
+  end
With that, your credentials.yml file could look something like this:
# config/credentials.yml
http_auth:
  username: superails
  password: 123
4. Schedule automatic recurring jobs (CRON) #
CRON - 5 * * * * * symbols that represent a recurring period. For example:
- 2 times a month on Wednesday at 13:45
- weekly on Sunday at 00:00
Schedule cron with good_job:
# config/initializers/good_job.rb

# show in logs
# STDOUT.sync = true
# $stdout.sync = true

Rails.application.configure do
  config.good_job.enable_cron = true
  config.good_job.cron = {
    every_minute: {
      cron: '* * * * *',
      class: "MyThingJob"
    }
    weekly_sunday: {
      cron: '0 0 * * 0',
      class: "MyThingJob"
    }
  }
end
5. Log errors #
# config/initializers/good_job.rb

# exception_notification
+  config.good_job.on_thread_error = -> (exception) { ExceptionNotifier.notify_exception(exception) }
# honeybadger
+  config.good_job.on_thread_error = -> (exception) { Honeybadger.notify(exception) }
# sentry
+  config.good_job.on_thread_error = -> (exception) { Sentry.capture_exception(exception) }
6. Production #
6.1. Digital Ocean App Platform #
If you are using Digital Ocean App platform, inside your app Create Resource From Source Code with the same source repository as your main one, but the type should be Worker.
Run Command for your Web app:
bin/rails db:migrate:with_data
rails server -p $PORT -e ${RAILS_ENV:-production}
Run Command for your Worker:
bundle exec good_job start --max-threads=8
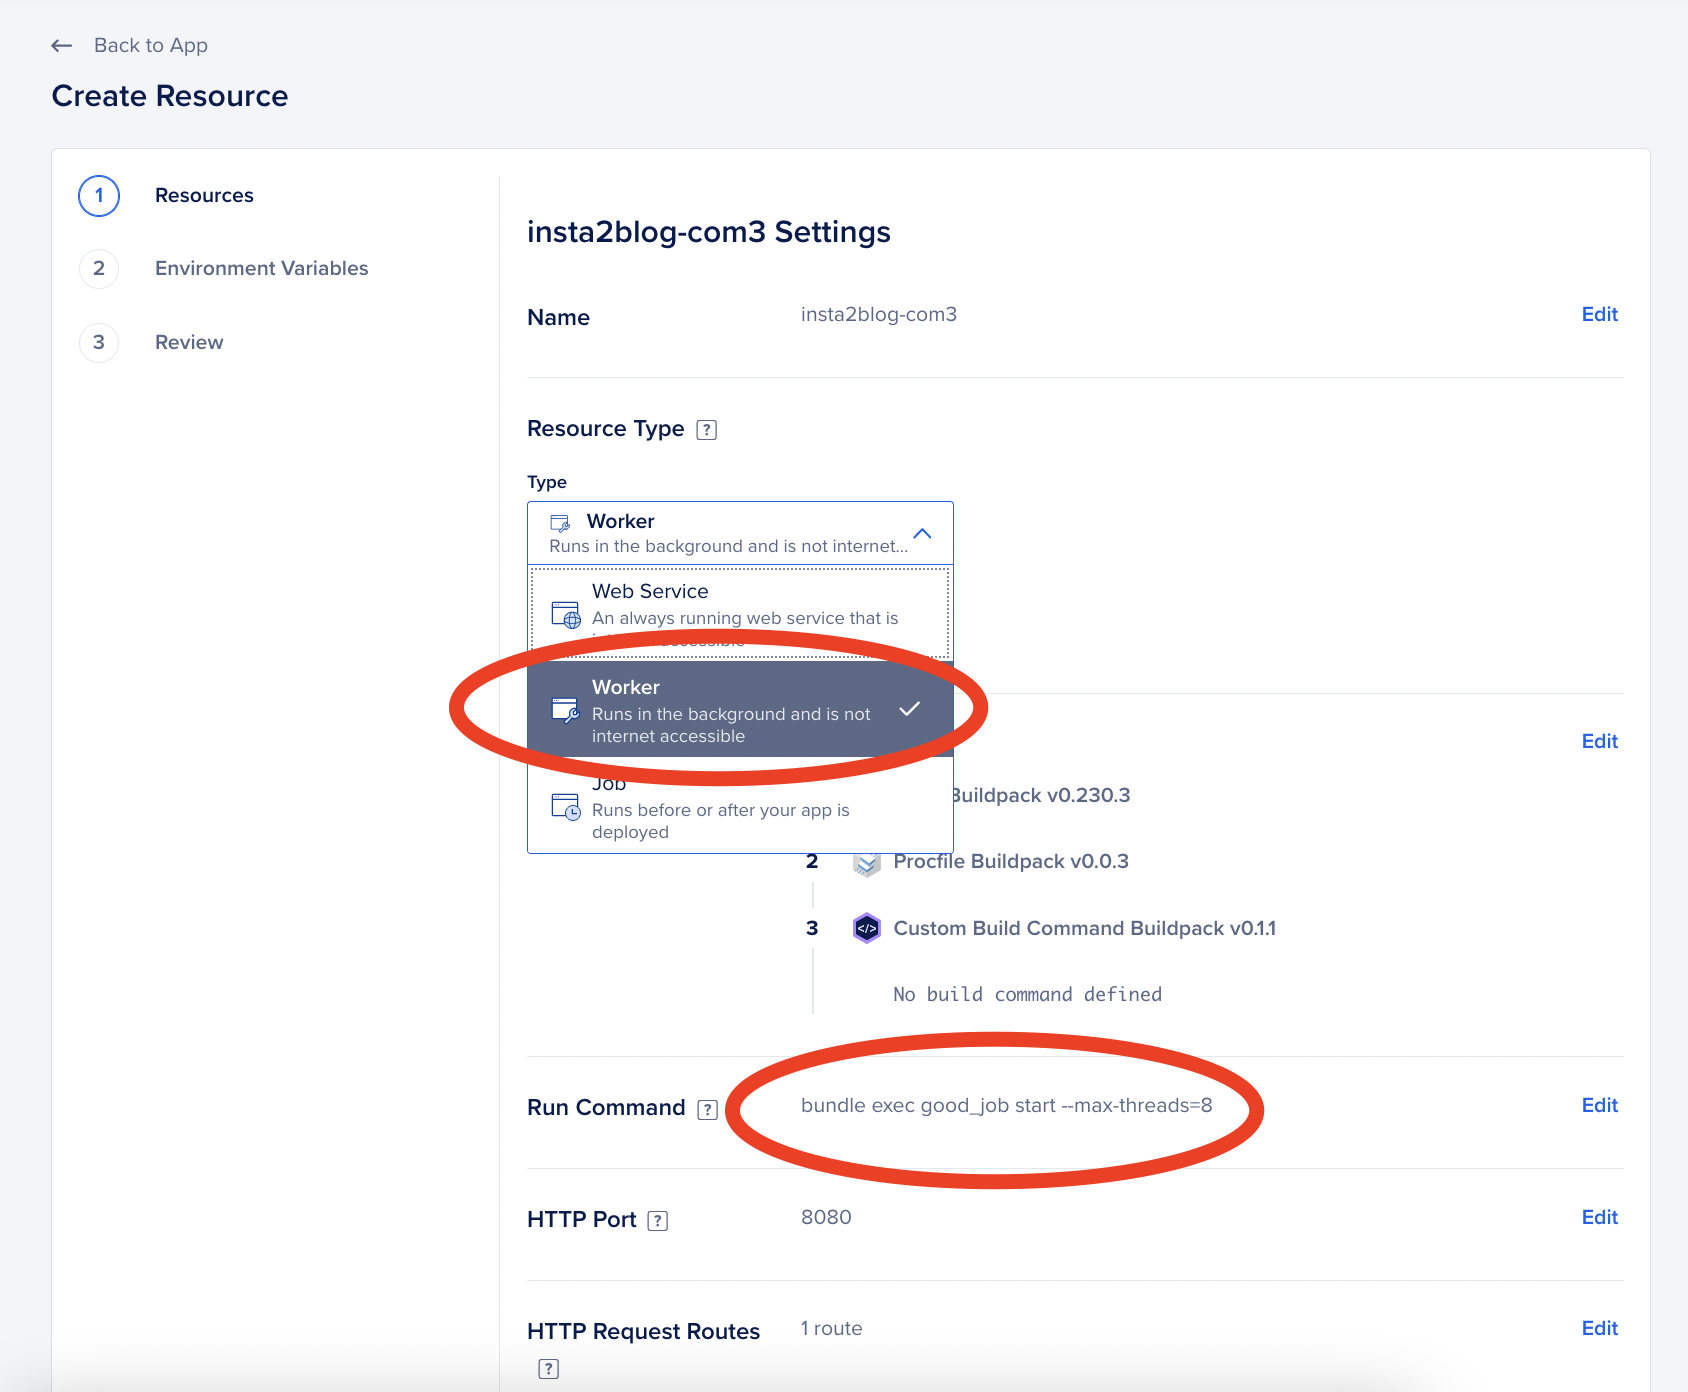
Don’t forget to all all the same ENV VARS, like RAILS_MASTER_KEY, DATABASE_URL as you would for your normal Rails app. After deploying, it should start working!
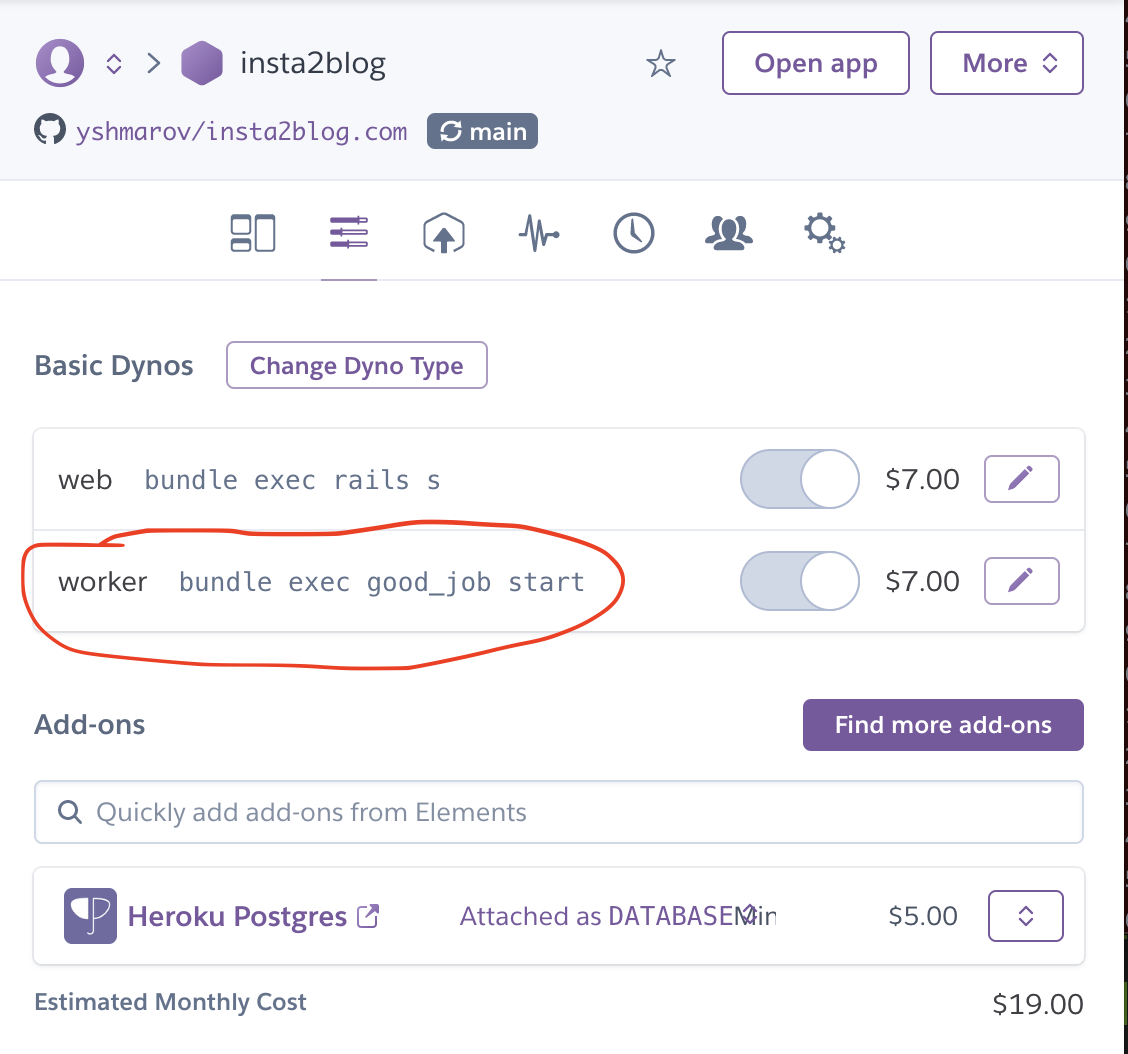
6.2. Heroku #
Procfile:
web: bundle exec rails s
worker: bundle exec good_job start
release: bin/rails db:migrate:with_data
After adding a procfile and deploying to heroku, it will create a worker resource in https://dashboard.heroku.com/apps/myapp/resources. You might need to upgrade it to a paid $7/mo dyno for it to work.
That’s it! 🎉🥳🍾
Did you like this article? Did it save you some time?
